Upper back pain is more common than you might think. It can stem from various causes, such as poor posture, muscle strain, or stress. Many experience this discomfort as a nagging ache or tightness between the shoulder blades. Ignoring it isn’t a good idea. Addressing upper back pain early can prevent it from worsening and affecting your daily life.
Yoga Poses for Upper Back Pain Relief
- Cat-Cow Pose
- Child’s Pose
- Thread the Needle Pose
- Downward-Facing Dog
- Seated Forward Bend
- Upper Back Stretch
- Cobra Pose
- Eagle Arms Pose
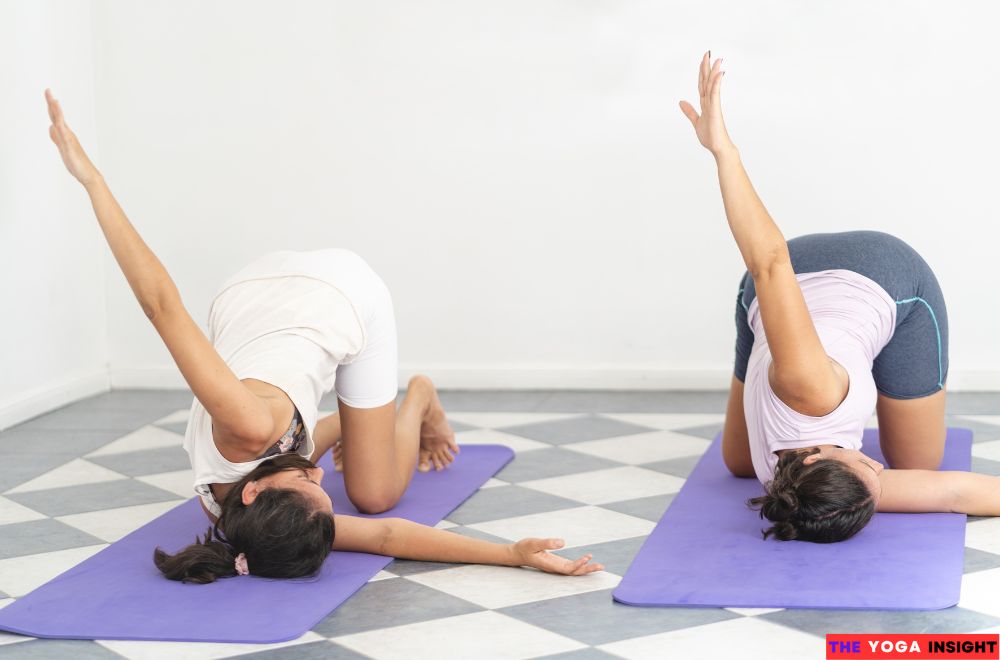
1. Cat-Cow Pose
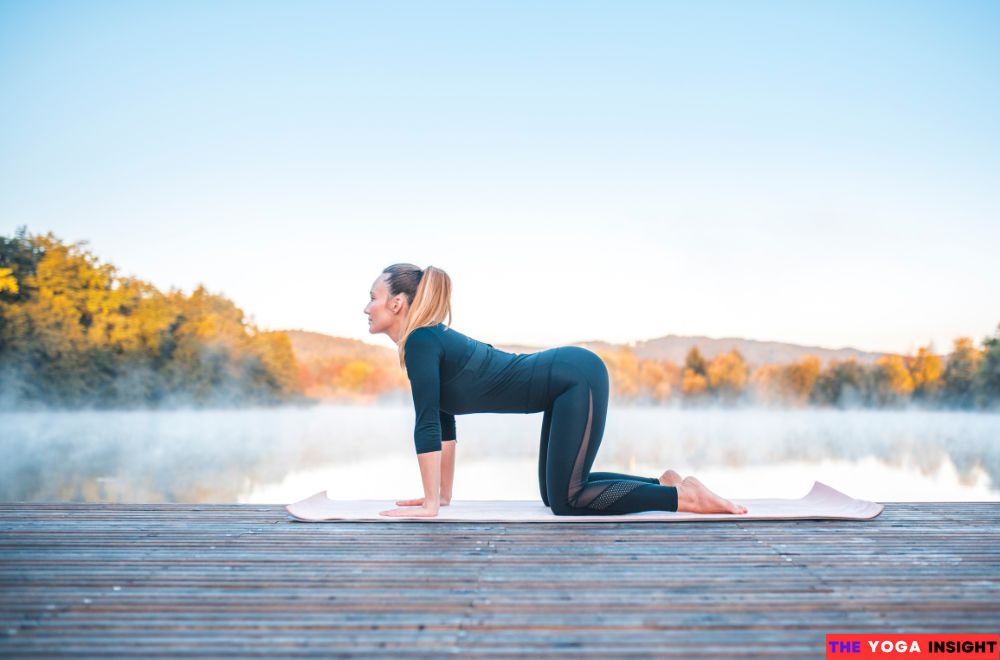
The Cat-Cow Pose is a staple in many yoga routines because it gently warms up and stretches the spine. This pose helps improve flexibility and strengthen the back, making it a favorite among beginners and seasoned practitioners. When performed correctly, it increases mobility in the spine and reduces tension in the back and neck. It’s like a gentle massage for your spine, easing stiffness and encouraging better posture. Think of it as a way to wake up your back after a long day at the desk or a challenging workout.
Step-by-Step Instructions:
- Start on All Fours: Begin by kneeling on the floor. Place your hands directly under your shoulders and your knees under your hips. Keep your fingers spread wide for better stability.
- Inhale and Arch Your Back (Cow Pose): As you breathe in, lift your tailbone towards the ceiling and let your belly drop towards the floor. Lift your head and gaze forward, creating a gentle curve in your lower back.
- Exhale and Round Your Back (Cat Pose): Tuck your chin to your chest and round your spine towards the ceiling as you breathe. Draw your belly button in towards your spine, creating a cat-like arch.
- Repeat the Movement: Continue to flow between Cat and Cow poses with your breath. Inhale into Cow Pose and exhale into Cat Pose.
- Finish and Relax: Return to a neutral spine position after several rounds. Sit back on your heels momentarily and take a few deep breaths to center yourself.
2. Child’s Pose
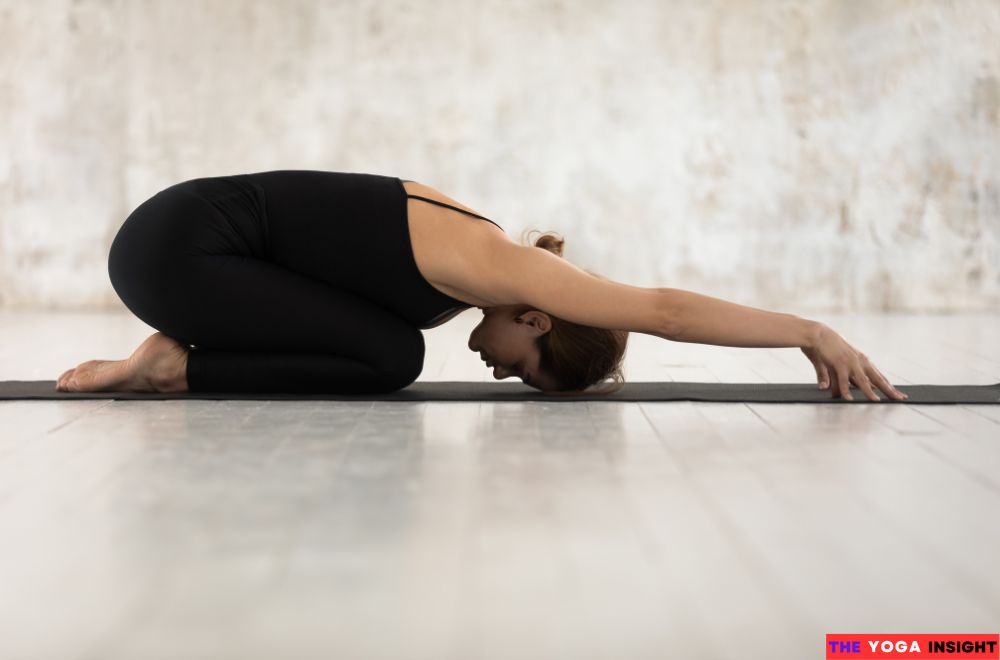
Child’s Pose, or Balasana, is a fundamental yoga pose with physical and mental benefits. This gentle stretch helps relieve tension and stress. It’s often used as a resting pose during yoga, allowing your body to recover and reset. Physically, it stretches the back, hips, and thighs, promoting flexibility and relaxation. The forward fold encourages a calming effect, which can help ease anxiety and promote mental clarity.
Step-by-Step Instructions:
- Start on All Fours: Begin by kneeling on the floor. Keep your knees about hip-width apart and your big toes touching.
- Sit Back: Gently lower your hips towards your heels, reaching your arms forward.
- Extend Your Arms: Stretch your arms before you, palms facing down, and rest your forehead on the mat.
- Relax and Breathe: Hold this position for several breaths. Focus on gentle stretching and deep breathing to enhance relaxation.
3. Thread the Needle Pose
Thread the Needle Pose is a fantastic stretch for opening your shoulders and upper back. It targets the often tight muscles in these areas, helping to improve flexibility and release tension. The pose is also great for your core, as it engages and strengthens the stabilizing muscles. In addition to its physical benefits, this pose can help calm your mind and reduce stress.
Step-by-Step Instructions:
- Start on All Fours: Begin by getting into a tabletop position on your hands and knees. Keep your wrists aligned with your shoulders and knees with your hips.
- Reach Under: Slide your right arm underneath your left arm. Bring your right shoulder and ear to the ground.
- Feel the Stretch: Allow your right side to sink into the floor while keeping your hips high. Feel the stretch across your upper back and shoulders.
- Hold and Breathe: Stay in this position for 20-30 seconds. Breathe deeply, and try to relax into the stretch.
- Return and Repeat: Gently lift your right arm and return to the starting position. Switch sides and repeat the process with your left arm.
4. Downward-Facing Dog
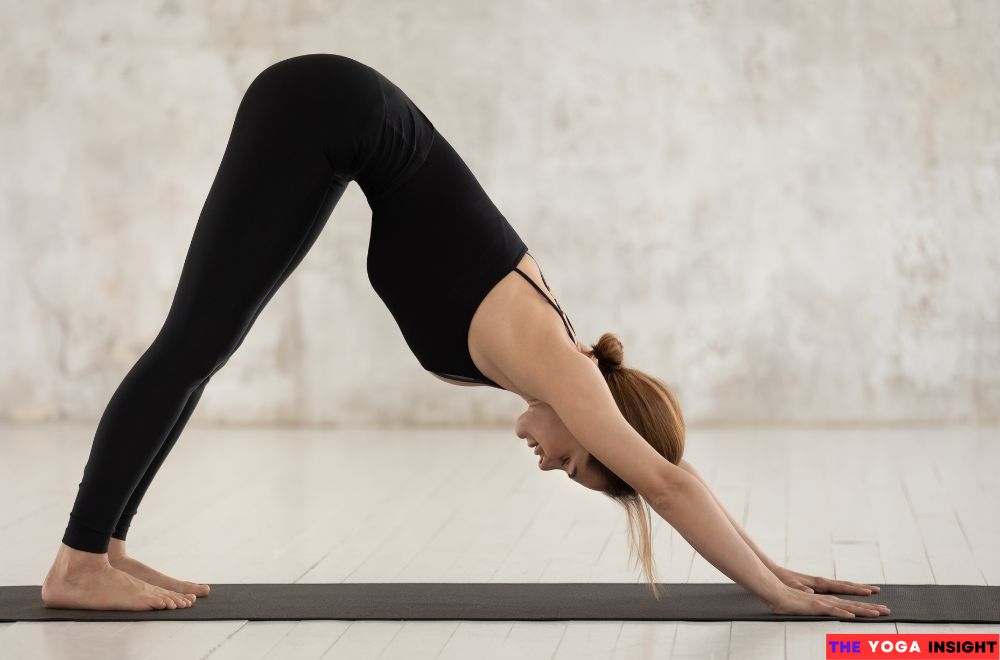
Downward-Facing Dog is a staple in yoga for a reason. It stretches the entire body while strengthening critical areas like your arms, legs, and core. This pose creates a deep stretch in your hamstrings, calves, and back, helping to release tension and improve flexibility. It also engages your core and shoulders, providing a great way to build strength and stability. It’s like hitting the reset button for your body, especially if you’ve been sitting for a long time or feeling stiff. This pose helps improve circulation and energy levels, making you more awake and alert.
Step-by-Step Instructions:
- Start in a Plank Position: Begin on all fours, with your wrists directly under your shoulders and knees under your hips.
- Lift Your Hips: Push back, lifting your hips towards the ceiling. Straighten your legs and press your heels towards the ground.
- Flatten Your Back: Create a straight line from your hands to your hips. Keep your back flat and avoid rounding your spine.
- Spread Your Fingers: Ensure your fingers are spread wide and press firmly into the floor.
- Relax Your Head: Keep your head between your upper arms, and don’t let it hang. Gaze towards your navel or your thighs.
- Hold the Pose: Breathe deeply and hold for 15-30 seconds.
- Release and Return: To come out, bend your knees and slowly lower your hips back to the starting position.
5. Seated Forward Bend
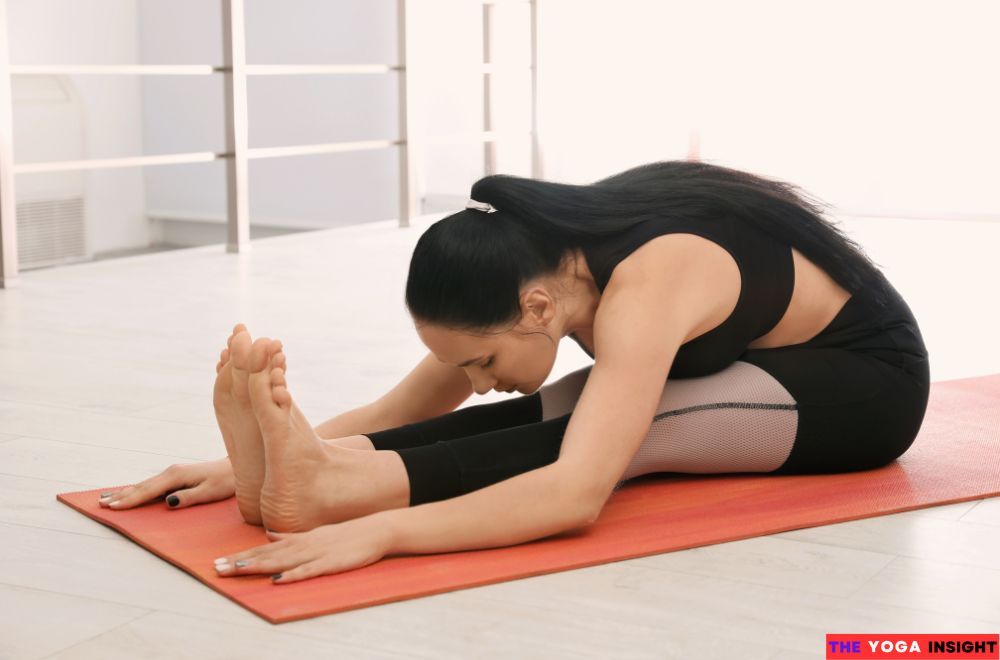
Seated Forward Bend, or Paschimottanasana, is more than just a stretch. It’s a pose that profoundly engages your entire back and hamstrings. You stretch these muscles and stimulate your digestive organs by reaching forward and folding over your legs. This pose improves flexibility and releases tension in the lower back, which many people need after a long day of sitting.
Step-by-Step Instructions:
- Sit on the Floor: Start by sitting on the floor with your legs stretched straight in front of you.
- Inhale and Lengthen: Take a deep breath and lengthen your spine, sitting up tall.
- Exhale and Fold
As you exhale, hinge from your hips and reach forward towards your feet. - Grab Your Feet: Hold onto your feet or shins if you can.
- Relax and Breathe: Relax your head and neck, and keep your breaths steady.
- Hold the Pose: Stay in this position for 30 seconds to a minute, then slowly rise back up.
6. Upper Back Stretch
Feeling tight in your upper back? You’re not alone. Many people experience this discomfort, especially if they spend long hours sitting at a desk.
The upper back stretch targets muscles that often become stiff due to poor posture or repetitive strain. By stretching these muscles, you help increase flexibility and improve blood flow. This can alleviate pain and reduce tension, leading to a more relaxed and comfortable back.
Step-by-Step Instructions:
- Find a Comfortable Position: Sit or stand up straight with your feet flat. If sitting, ensure your back is straight, and your shoulders are relaxed.
- Extend Your Arms: Reach both arms out before you, keeping them straight. Interlock your fingers.
- Round Your Upper Back: Push your hands forward and round your upper back. Imagine trying to push something away from you. Hold this position for a few seconds.
- Stretch Further: For a deeper stretch, gently push your hands away from you while keeping your back rounded. You should feel the stretch between your shoulder blades.
- Release and Relax: Slowly release your hands and return to a neutral position. Take a few deep breaths and repeat the stretch as needed.
7. Cobra Pose
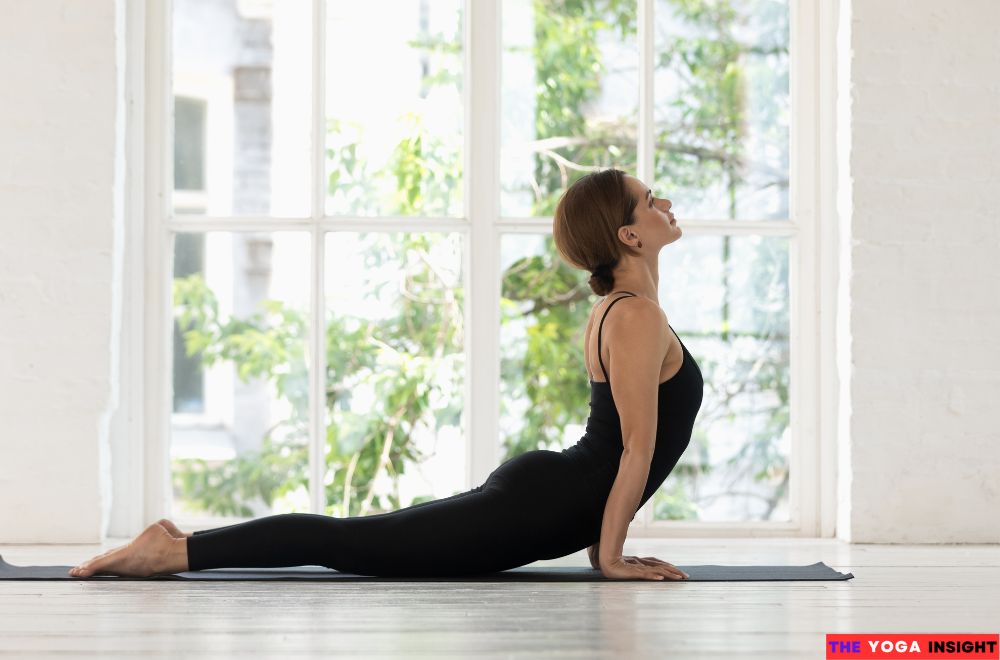
Cobra Pose, or Bhujangasana, is more than just a yoga move; it’s a natural way to relieve tension and build strength. When you lift your chest and stretch your belly, it opens up your heart and lungs. This position improves your posture and massages your abdominal organs, boosting digestion. Think of it as a gentle wake-up call for your spine, helping to counteract the effects of sitting too long.
Step-by-Step Instructions:
- Lie Down: Start by lying face down on your mat, with your legs extended and feet about hip-width apart.
- Place Your Hands: Position your hands under your shoulders, elbows close to your body.
- Lift Up: Inhale and slowly press into your hands, lifting your chest off the ground.
- Engage Your Core: Keep your shoulders relaxed, away from your ears, and engage your core.
- Hold the Pose: Gaze slightly upward, holding the pose for a few breaths.
- Release: Exhale and gently lower yourself back down to the mat.
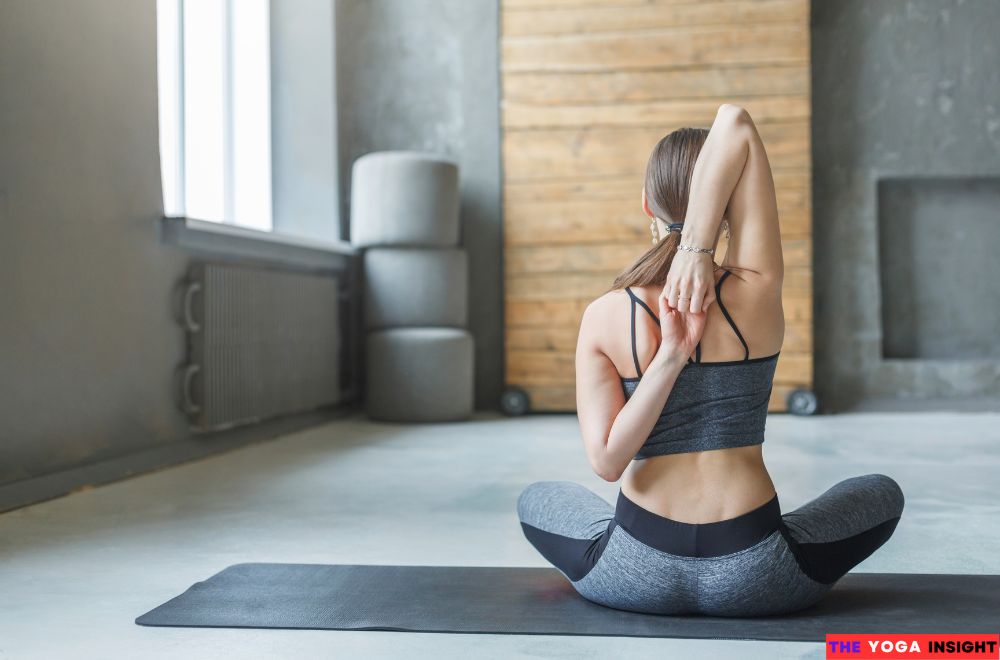
8. Eagle Arms Pose
The Eagle Arms Pose, or Garudasana Arms, is a dynamic yoga stretch designed to increase flexibility and strength in the upper body. It targets the shoulders, upper back, and arms, often tight from sitting at desks or other daily activities. By wrapping the arms around each other, this pose creates a deep stretch that helps release tension and improve range of motion.
Step-by-Step Instructions:
- Start with a Seated Position: Sit comfortably in a chair or on the floor with your back straight and shoulders relaxed.
- Extend Your Arms: Reach both arms straight out in front of you, palms facing down.
- Cross Your Arms: Cross your right arm over your left arm at the elbow, bringing your palms to face each other.
- Bind Your Arms: Bend your elbows and try to bring your palms to touch or interlace your fingers if possible.
- Lift and Hold: Gently lift your elbows and stretch your fingertips toward the ceiling. Hold this position for 20-30 seconds, feeling the stretch across your shoulders and upper back.
- Release and Switch Sides: Slowly unwind your arms and repeat the process on the opposite side, crossing the left arm over the right.
Read More: 10 Yoga Poses for Lower Back Pain Relief
FAQs about Yoga Poses for Upper Back Pain Relief
How often should I practice yoga for upper back pain relief?
Practicing these poses 3-4 times a week can help manage upper back pain. Consistency is key to seeing improvements.
Can yoga cure entirely upper back pain?
While yoga can significantly reduce pain and improve flexibility, combining it with other treatments is essential if necessary. Consult with a healthcare provider for a comprehensive approach.
Are there any yoga poses I should avoid if I have upper back pain?
Avoid poses that strain your back or involve heavy twisting. Listen to your body and modify poses as needed.
How long should I hold each pose?
Hold each pose for 20-30 seconds and repeat 2-3 times. Focus on your breath and listen to your body’s signals.
Final Thought
Incorporating yoga into your routine can be a game-changer for upper back pain relief. Poses like Cat-Cow, Child’s Pose, Thread the Needle, and Downward-Facing Dog help alleviate pain and promote overall well-being. By regularly practicing these yoga poses for upper back pain relief, you can experience improved flexibility, reduced tension, and a more comfortable back. Give these poses a try and feel the difference as you take control of your back health.