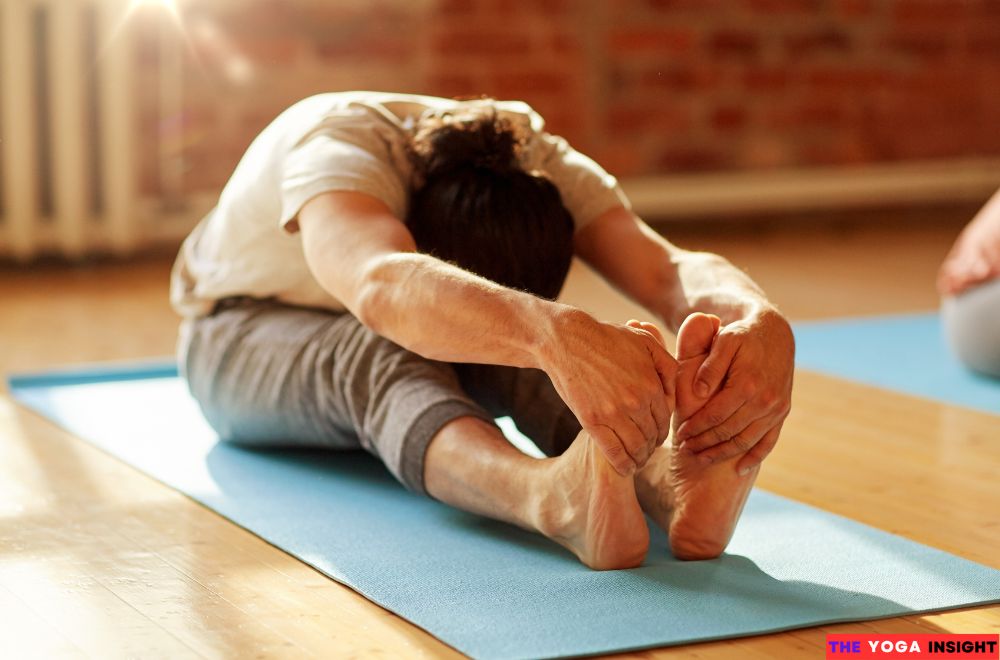
Starting yoga at home is one of the best decisions you can make for your well-being. It’s not just about stretching or getting fit. Yoga is a holistic practice that improves mental, physical, and emotional health. Whether you’re looking to relieve stress, increase flexibility, or get a little more active, yoga has something for everyone. This guide is tailored for beginners, focusing on simple foundational poses to learn and practice at home. You don’t need to be flexible or experienced to start. All you need is a little space, time, and the willingness to try something new.
What You Need to Start
Before practicing poses, set up your practice space and gather items to make your yoga journey comfortable and enjoyable.
Essential Equipment
First, you’ll need a yoga mat.
It’s not just a piece of rubber; it’s your space, your sanctuary where you can connect with your body and mind. A good mat provides cushioning and grip, helping you maintain balance and avoid slipping during poses.
Next, choose comfortable clothing.
You don’t need fancy gear—just something that allows you to move freely without restriction. Loose-fitting or stretchy clothing works best. If you want to deepen your practice, consider adding props like blocks or straps. They’re not mandatory but can help you achieve better alignment and make poses more accessible, especially if you’re starting.
Creating the Perfect Space
Your yoga space doesn’t need to be elaborate, but it should be quiet and distraction-free. Find a spot in your home where you feel calm and at ease. If you have the space, this could be a corner of your living room, bedroom, or even a dedicated yoga room. Clear away any clutter, and set the mood with soft lighting or candles. The goal is to create an environment where you can focus solely on your practice without interruptions from the outside world.
Setting Your Intentions
Yoga is as much about the mind as it is about the body. Before you start your practice, take a moment to set your intentions. This could be as simple as focusing on your breath or a specific goal like increasing flexibility or finding inner peace. Mindfulness is vital in yoga, and setting intentions helps ground your practice, making it more meaningful and effective. Remember, yoga isn’t just about getting into poses; it’s about connecting with yourself on a deeper level. So, take a deep breath, let go of any distractions, and get ready to explore the world of yoga from the comfort of your home.
Yoga Poses for Beginners at Home
- Mountain Pose (Tadasana)
- Downward Facing Dog (Adho Mukha Svanasana)
- Child’s Pose (Balasana)
- Warrior I (Virabhadrasana I)
- Warrior II (Virabhadrasana II)
- Triangle Pose (Trikonasana)
- Tree Pose (Vrksasana)
- Bridge Pose (Setu Bandhasana)
- Cat-Cow Pose (Marjaryasana-Bitilasana)
- Seated Forward Bend (Paschimottanasana)
- Cobra Pose (Bhujangasana)
- Butterfly Pose (Baddha Konasana)
- Plank Pose (Phalakasana)
- Corpse Pose (Savasana)
- Easy Pose (Sukhasana)
1. Mountain Pose
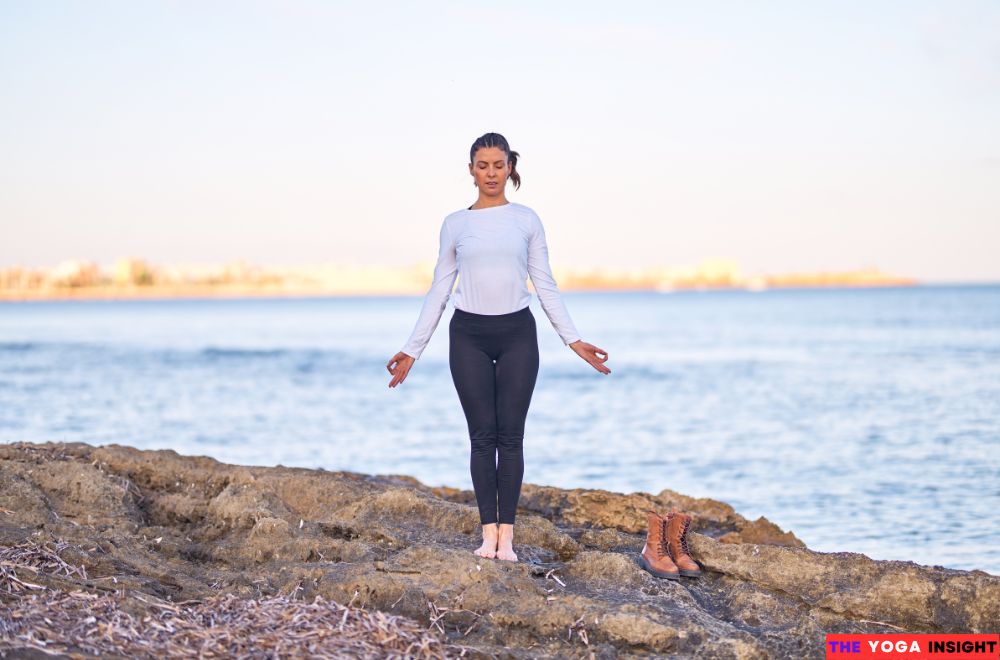
At first glance, Mountain Pose might seem like just standing there, but it’s so much more. This pose works because it teaches you the art of standing tall. Think about it: In our daily lives, we slouch and lean and often forget our posture. Tadasana pulls you back to the basics, encouraging your body to align correctly. It activates your thighs, engages your core, and opens up your chest—all while keeping you grounded through your feet.
Mountain Pose is even more powerful because it sets the stage for all other standing poses. Mastering this pose gives you the foundation for balance, strength, and flexibility in more complex movements. It’s like building a solid base for a house; without it, everything else can wobble.
Step-by-Step Instructions:
Performing Tadasana is straightforward, but the details matter. Here’s how to get it right:
- Start with your feet together: Your big toes should touch, with a small gap between your heels. If that’s uncomfortable, keep your feet hip-width apart.
- Engage your thighs: Lift your kneecaps and feel your thighs tighten. This action stabilizes your legs and helps you stand firm.
- Tuck your tailbone slightly: This isn’t about forcing your lower back to flatten but rather about finding a neutral spine.
- Lift your chest: Open your heart space by gently pulling your shoulder blades together and down.
- Let your arms hang naturally: With palms facing forward, keep your fingers relaxed and energized.
- Find your gaze: Look straight ahead, keeping your chin parallel to the floor. Feel the length from the crown of your head down to your heels.
- Breathe deeply: Inhale and exhale with awareness, feeling the stability and strength in your posture.
2. Downward Facing Dog
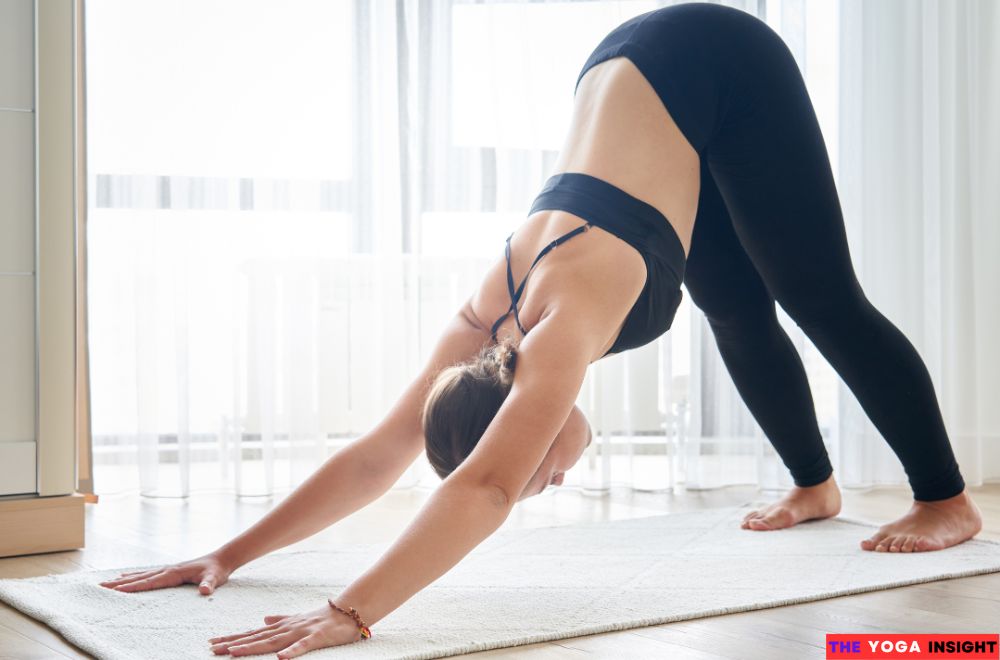
The Downward Facing Dog, or Adho Mukha Svanasana, is a staple in many yoga routines. But why is this pose so universally loved? It’s simple—it works your entire body in one fluid movement. You’re not just stretching your hamstrings or working your arms in this pose. You’re simultaneously engaging your core, improving your posture, and lengthening your spine.
This pose is like the Swiss Army knife of yoga. It offers a bit of everything: strength, flexibility, and even a touch of mental clarity.
It’s especially effective because it’s a weight-bearing exercise that helps build bone density, particularly in the arms and shoulders. Plus, it’s a gentle inversion, which means your head is below your heart, helping to boost circulation and relieve stress.
Step-by-Step Instructions:
Getting into Downward Facing Dog might initially seem tricky, but it’s about finding balance. Here’s how to nail it:
- Start on all fours: Place your hands directly under your shoulders and your knees under your hips. Spread your fingers wide and press into the mat with your palms.
- Tuck your toes: Slowly lift your knees off the ground. Straighten your legs as much as possible, pushing your hips up and back.
- Lengthen your spine: Imagine a straight line from your hands to your hips. You aim to create a long, inverted V shape with your body.
- Adjust your feet: Bend your knees slightly if your hamstrings feel tight. Keeping your spine straight is more important than forcing your heels down.
- Engage your core: Pull your belly button towards your spine to support your lower back.
- Relax your head and neck: Let your head hang naturally between your arms. Keep your gaze between your legs or up towards your navel.
- Hold and breathe: Stay in the pose for five deep breaths, feeling the stretch in your hamstrings and the strength in your arms.
3. Child’s Pose
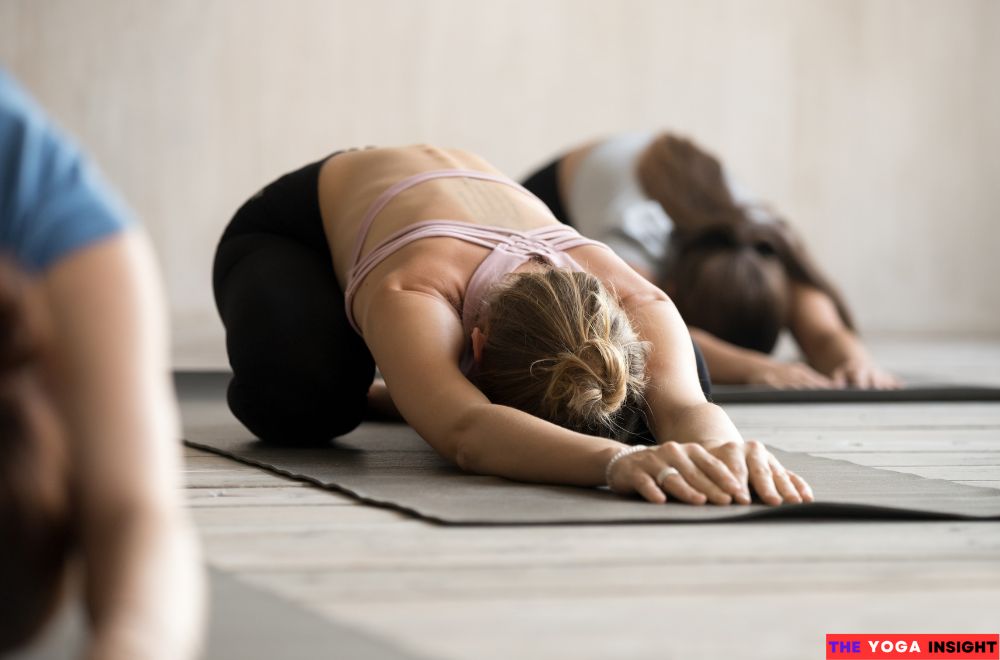
Child’s Pose isn’t just about curling up and taking a breather, though that’s a big part of its appeal. This pose stretches your back, hips, thighs, and ankles, releasing tension you didn’t even know you had. Think of it as hitting the reset button on your body after a long day or an intense workout.
It’s also fantastic for your mind. The forward fold in this pose signals your nervous system to relax, making it perfect for stress relief. When life gets hectic, spending a few moments in Child’s Pose can bring a sense of calm and clarity.
Step-by-Step Instructions:
- Start by kneeling on the floor. Bring your big toes together, and sit back on your heels.
- Separate your knees about hip-width apart or more comprehensive if it feels better.
- Exhale as you lay your torso down between your thighs, extending your arms forward with palms down.
- Rest your forehead on the mat and relax your shoulders, letting them melt away from your ears.
- Stay in the pose for several breaths, feeling the stretch in your back and the release in your hips.
- To leave the pose, gently press your hands onto the floor and slowly lift yourself back to seated.
4. Warrior I
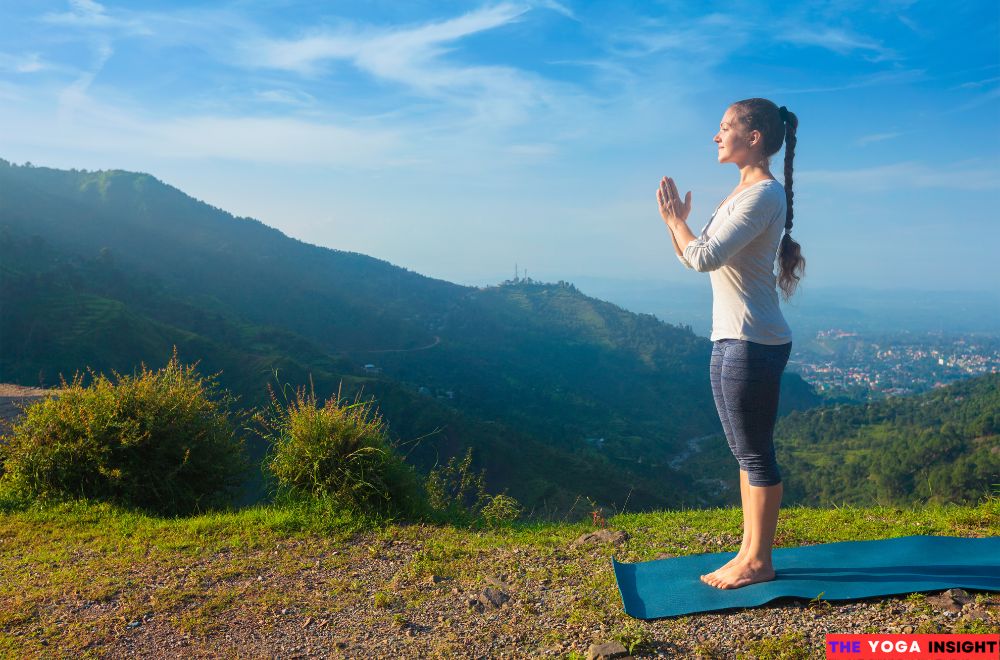
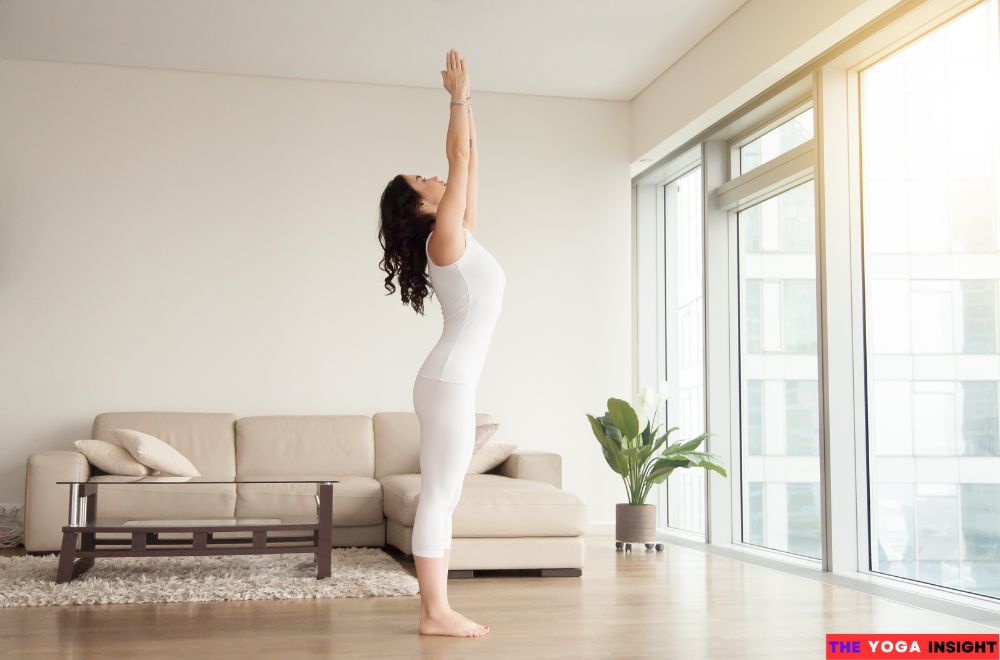
Warrior I is a go-to pose for building physical and mental resilience. This pose stretches the chest, lungs, shoulders, neck, belly, and groins (psoas). It strengthens the shoulders, arms, and back muscles while toning the lower body. But beyond the physical benefits, Warrior I helps build focus, concentration, and inner strength. Holding this pose requires mental stamina, making it an excellent practice for mindfulness.
Step-by-Step Instructions:
- Start in Mountain Pose (Tadasana): Stand tall with your feet together and your arms at your sides. Ground your feet into the mat, feeling the connection with the earth.
- Step Back: Take a big step back about 3 to 4 feet apart with your left foot. Keep your right foot pointing forward and your left at a slight angle.
- Bend Your Right Knee: Align your right knee directly over your right ankle. Your thigh should be parallel to the floor. Keep your left leg straight and strong.
- Raise Your Arms: Inhale your arms overhead, reaching for the sky. Keep your palms facing each other, or touch them together. Extend through your fingertips.
- Square Your Hips: Focus on squaring your hips to the front of the mat. This might mean pulling your left hip slightly forward and your right hip back.
- Hold and Breathe: Engage your core and lengthen your spine. Hold the pose for 5 to 10 breaths, maintaining steady and deep breathing.
- Release: To exit, straighten your right leg, lower your arms, and step your left foot forward to meet your right. Repeat on the other side.
5. Warrior II
Warrior II isn’t just about standing with your legs apart and arms stretched out—it’s about engaging your entire body to promote balance, strength, and focus. This pose works because it targets multiple muscle groups at once. Your legs, core, arms, and back get involved, making it a full-body workout in one pose. The extended stance helps open your hips and chest, improving flexibility and posture.
Step-by-Step Instructions:
- Start in Mountain Pose: Stand tall with your feet together and arms at your sides. Take a moment to find your center.
- Step Back: Take a comprehensive step back with your left foot, about 3 to 4 feet. Keep your right foot pointing forward and turn your left foot slightly inward.
- Bend Your Front Knee: Bend your right knee directly over your ankle. Your thigh should be parallel to the ground. Make sure your left leg stays straight and strong.
- Extend Your Arms: Stretch your arms out to the sides, parallel to the floor, palms facing down. Your shoulders should be relaxed, not hunched.
- Gaze Forward: Look over your right hand, keeping your gaze soft but focused.
- Hold the Pose: Stay in Warrior II for 30 seconds to a minute. Breathe deeply and feel the strength and energy in your body.
- Switch Sides: Slowly straighten your front leg, lower your arms, and step your back foot forward. Repeat on the other side.
6. Triangle Pose
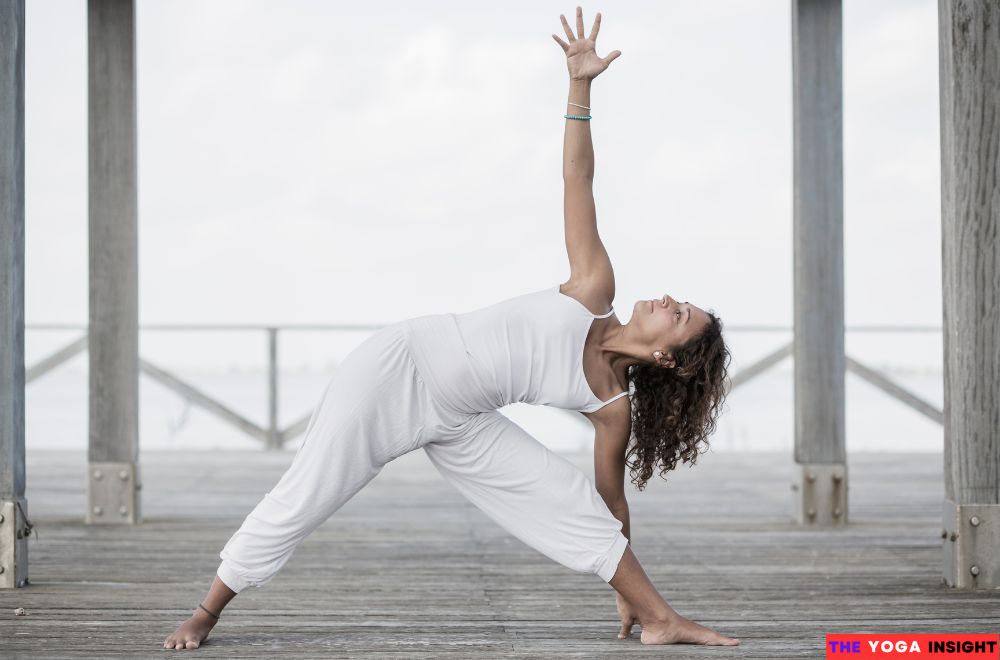
So, why is the Triangle Pose such a go-to in yoga routines? It’s all about the alignment and the stretch.
When you enter Trikonasana, you open your chest, stretch your spine, and engage your core. The pose helps lengthen your torso, which not only improves posture but also aids digestion.
Plus, the deep stretch along the legs can help relieve the stress and tension many carry daily. It’s like giving your body a gentle wake-up call, reminding it to stand tall and move gracefully.
Step-by-Step Instructions:
Let’s break it down step by step so you can practice with confidence:
- Start by Standing Tall: Begin in Mountain Pose (Tadasana) with your feet hip-width apart and your arms relaxed at your sides.
- Step Out: Take a comprehensive step to the side, about 3 to 4 feet apart. Turn your right foot out at a 90-degree angle and keep your left foot slightly turned in.
- Extend Your Arms: Lift your arms parallel to the floor, reaching out to both sides. Your shoulders should be relaxed, and your palms facing down.
- Reach and Tilt: Inhale deeply. As you exhale, reach your right hand forward, extending your torso. Then, tilt your body to the right, lowering your right hand towards your shin, ankle, or the floor outside your right foot. Your left arm reaches up towards the ceiling.
- Gaze Up: Turn your head to gaze at your left thumb, keeping your neck long and aligned with your spine.
- Hold and Breathe: Stay in the pose for 5 to 10 breaths. Focus on maintaining your alignment and breathing deeply into the stretch.
- Come Back Up: Inhale to lift back up to standing, then switch sides.
7. Tree Pose
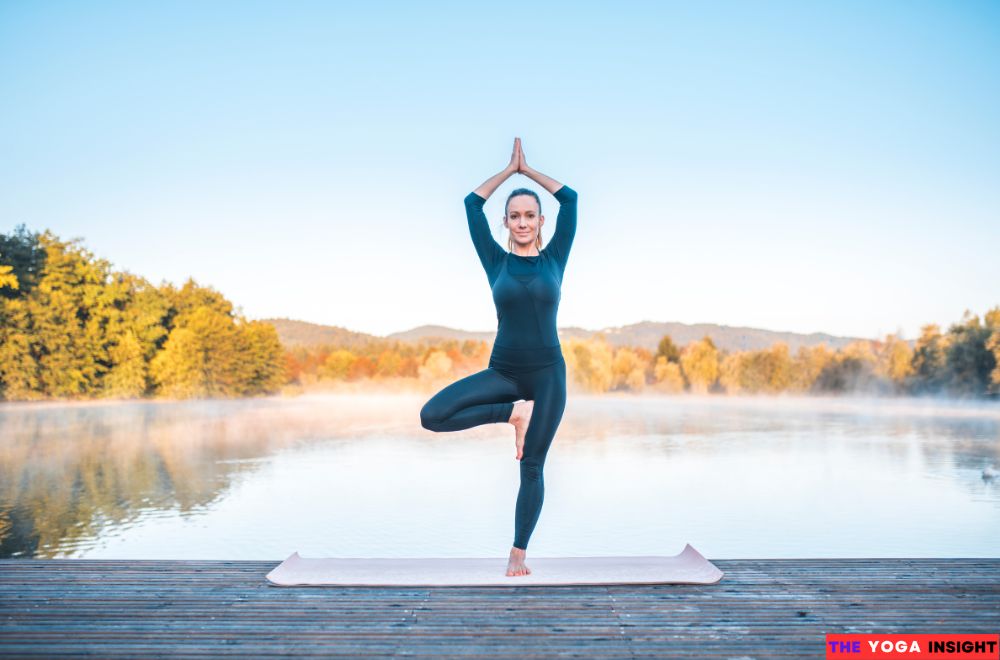
Tree Pose is more than just a balance challenge—a whole-body workout wrapped up in one elegant move.
Here’s why:
- First, it strengthens your legs, particularly the calves, ankles, and thighs. When you balance on one leg, those muscles have to work extra hard to keep you steady.
- Next, it engages your core. A strong core is key to balance, and Tree Pose forces those deep abdominal muscles to activate and stabilize your body.
- Finally, it’s a mental exercise. Holding this pose requires focus and calm, teaching you to find stillness and concentration even when life feels off-kilter.
Step-by-Step Instructions:
- Start in Mountain Pose: Stand tall with your feet together, grounding through all four corners of your feet.
- Shift your weight: Slowly transfer your weight onto your right foot, rooting it firmly into the ground.
- Lift your left foot: Bend your left knee and place the sole of your left foot on your right inner thigh. If that’s too challenging, you can lower it on your leg, avoiding the knee.
- Find your balance: Bring your hands to your heart in a prayer position, or if you feel steady, extend them overhead like the branches of a tree.
- Hold and breathe: Stay here for a few breaths, focusing on a point in front of you to help maintain your balance.
- Switch sides: Slowly lower your left foot back to the ground and repeat on the other side.
8. Bridge Pose
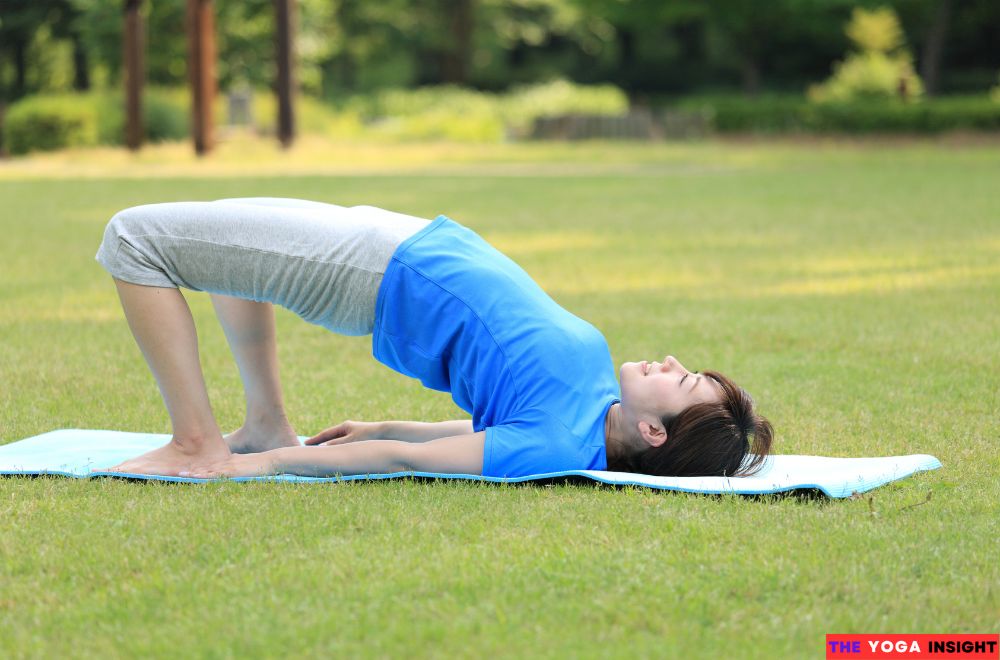
Bridge Pose isn’t just about looking graceful on your yoga mat. It’s about strengthening your body and calming your mind. When you lift your hips in Bridge Pose, you engage your glutes, hamstrings, and lower back. These muscles are often neglected, especially if you spend much time sitting. At the same time, the pose opens up your chest and shoulders, improving posture and relieving tension from hunching over a computer all day.
Step-by-Step Instructions:
- Start by lying on your back. Bend your knees and place your feet flat, hip-width apart. Your arms should rest by your sides, palms facing down.
- Press your feet firmly into the ground. As you do this, engage your thighs and buttocks. Imagine pushing the floor away from you with your feet.
- Slowly lift your hips towards the ceiling. Keep your thighs and feet parallel to each other. Your body should form a straight line from your shoulders to your knees.
- Clasp your hands underneath your back. If it feels comfortable, interlace your fingers and press your arms into the mat to help lift your hips higher.
- Hold the position for a few breaths. Focus on steady, deep breaths. Inhale, and feel your chest expanding. Exhale, and press your feet even more into the floor.
- To release, gently lower your hips back to the ground. Bring your knees together and rest briefly before moving to the next pose.
9. Cat-Cow Pose
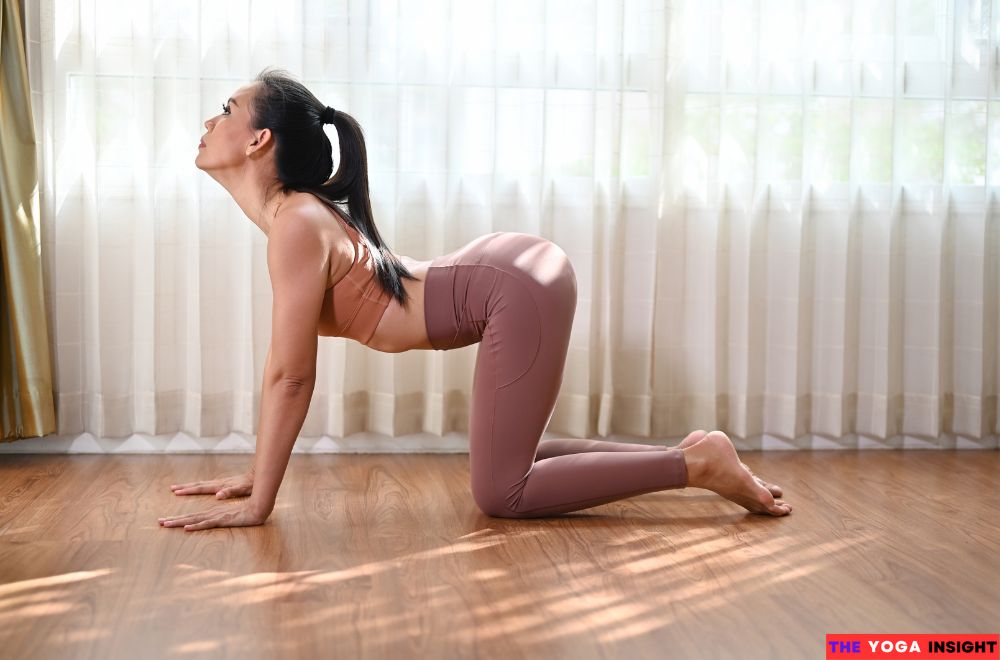
At first glance, the Cat-Cow Pose might seem too easy to be effective, but that’s where its beauty lies. This pose targets your spine, helping to increase flexibility in the neck, shoulders, and back.
It’s especially beneficial if you spend a lot of time sitting, which can cause the spine to stiffen. The gentle back-and-forth motion stretches and strengthens the muscles surrounding your spine, helping to relieve tension and improve posture.
Step-by-Step Instructions:
- Start on All Fours: Get down on your hands and knees. Align your wrists directly under your shoulders and your knees under your hips. Your back should be flat, and your gaze should be toward the floor.
- Move into Cow Pose: Inhale profoundly and drop your belly toward the mat. Lift your chin and chest, letting your gaze rise toward the ceiling. Your back will naturally curve, creating a gentle arch. This is the “Cow” part of the sequence.
- Transition to Cat Pose: As you exhale, draw your belly in toward your spine and round your back toward the ceiling. Tuck your chin to your chest and let your head drop toward the floor. This will round your spine, resembling a “Cat” stretching its back.
- Flow Between the Poses: Move between Cat and Cow poses, synchronizing your breath with your movements. Inhale as you move into Cow, and exhale as you transition into Cat. Repeat this flow for 5-10 breaths or longer if it feels good.
- Return to Neutral: Return to a neutral spine position with a flat back after completing your sequence. Take a moment to notice how your body feels.
10. Seated Forward Bend
Paschimottanasana isn’t just about touching your toes. It’s about calming the mind and giving your body a gentle but deep stretch. When you lean forward, you compress your abdomen, which helps to massage the internal organs. This improves digestion and can even help relieve stress. The stretch across your spine also helps to relieve lower back pain. It’s like giving your entire body a well-deserved hug. This pose encourages flexibility in both your body and mind. Regularly practicing lets you notice how your breath deepens, your focus sharpens, and your body becomes more flexible.
Step-by-Step Instructions:
- Start by Sitting Tall: Sit on the floor with your legs extended straight in front of you. Flex your feet to engage your thighs.
- Inhale and Lengthen Your Spine: Lift your arms overhead, reaching towards the sky to elongate your spine. This helps create space in your lower back.
- Exhale and Begin to Fold Forward: Hinge at your hips, not your waist. Keep your spine long as you reach toward your feet. It’s okay if you can’t touch your toes—what’s important is that you feel the stretch.
- Find Your Comfort Zone: Once you reach as far as possible, relax your hands on your legs, ankles, or feet—wherever feels right.
- Breathe Deeply: With each inhale, imagine your spine growing longer. With each exhale, allow yourself to fold deeper, releasing tension.
- Hold and Relax: Stay in the pose for 1-3 minutes, allowing your breath to guide you. Feel the calmness and let go of any stress.
11. Cobra Pose
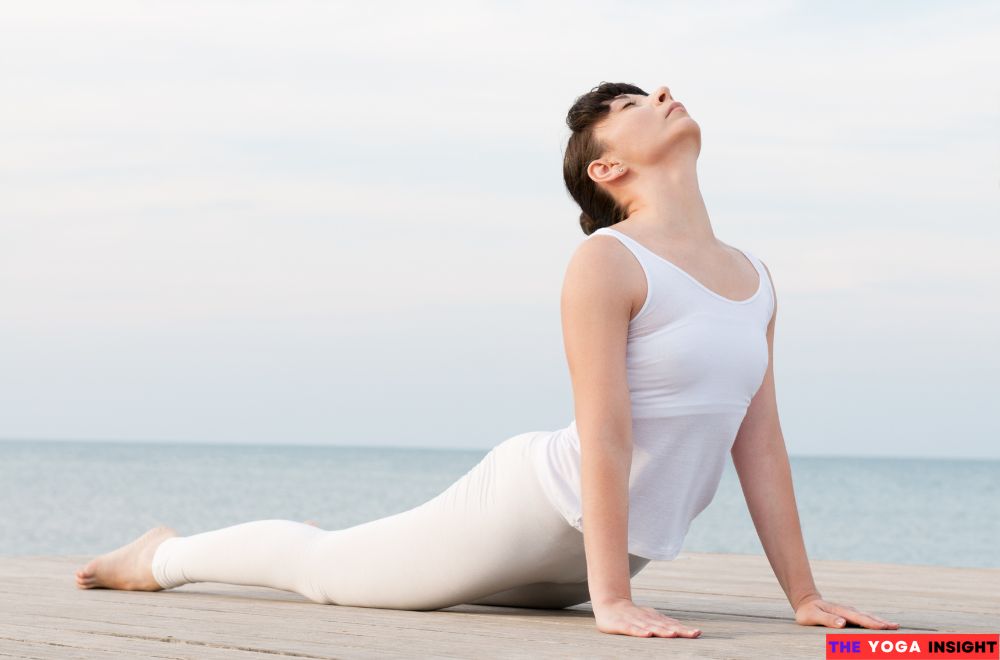
The magic of Cobra Pose lies in its ability to open up your chest and stretch your spine. When you lift your chest off the ground, your back muscles engage, strengthening them over time. This is particularly beneficial if you spend a lot of time sitting, as it counteracts the forward hunch that many of us fall into.
Additionally, the gentle compression of your lower back stimulates blood flow, helping to nourish your spinal discs and improve flexibility. It’s like giving your back a well-deserved massage, but you’re doing it yourself!
Step-by-Step Instructions:
Performing Cobra Pose is simple, but it requires attention to detail. Here’s how you can do it:
- Start by lying face down on your yoga mat, with your legs extended straight back and the tops of your feet pressing into the mat.
- Place your palms flat on the mat under your shoulders, with your elbows tucked close to your body.
- As you inhale, slowly lift your chest off the mat, using the strength of your back muscles. Keep your elbows slightly bent and your shoulders relaxed away from your ears.
- Press the tops of your feet and thighs firmly into the mat as you lift, ensuring your lower back remains supported.
- Hold the pose for a few breaths, feeling the stretch along your spine and the opening in your chest.
- Exhale and slowly lower your chest to the mat, releasing the pose with control.
12. Butterfly Pose
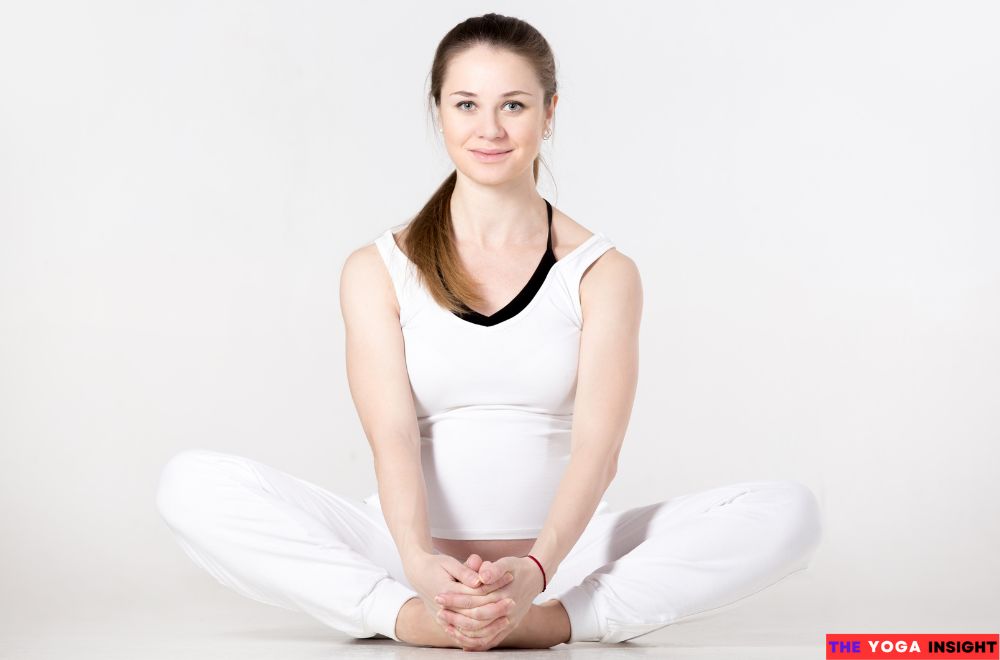
The Butterfly Pose, or Baddha Konasana, is more than a simple stretch. It opens up your hips and inner thighs, which often hold a lot of tension from sitting too much or intense workouts. This pose is particularly beneficial because it increases flexibility in the groin and hip region, promotes better posture, and can help relieve stress.
Step-by-Step Instructions:
- Start Seated: Sit down with your legs extended straight in front of you. Sit tall, ensuring your spine is straight, and your shoulders are relaxed.
- Form the Pose: Bend your knees, bringing the soles of your feet together. Let your knees fall to the sides, keeping your feet close to your pelvis.
- Hold Your Feet: Clasp your hands around your feet and gently pull your heels closer to your pelvis as much as it feels comfortable.
- Engage Your Hips: Try pressing your knees closer to the ground without forcing. You should feel a gentle stretch in your inner thighs and groin area.
- Lengthen Your Spine: Sit up straight, lengthening your spine. Avoid rounding your back. Keep your shoulders relaxed and your chest open.
- Stay and Breathe: Hold the position for 30 seconds to a minute. Breathe deeply, allowing your body to relax into the stretch.
- Release: To come out of the pose, gently lift your knees and extend your legs back in front of you.
13. Plank Pose
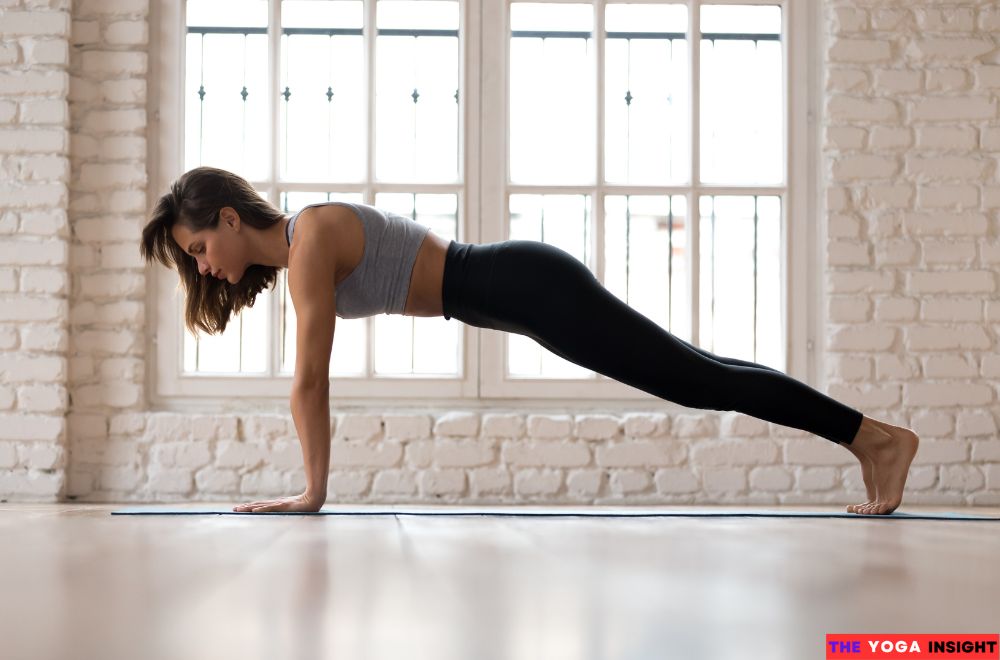
The Plank Pose, or Phalakasana, is one of those exercises that might look simple at first glance. But don’t let its simplicity fool you. This pose is a powerhouse when it comes to building core strength. It’s not just about your abs; the plank engages your entire body, from your shoulders to your toes.
Step-by-Step Instructions:
- Start on All Fours: Get down on your hands and knees. Keep your hands directly under your shoulders and your knees under your hips.
- Extend Your Legs: Now, step your feet back one at a time, extending your legs fully. Your body should form a straight line from your head to your heels.
- Engage Your Core: This is key. Tighten your abdominal muscles as if you’re bracing for a punch. This helps protect your lower back and keeps your hips from sagging.
- Keep Your Back Flat: Imagine you’re balancing a glass of water on your back. There are no dips or peaks—just a flat, solid surface.
- Hold the Position: Maintain good form while staying in this position for as long as possible. Start with 20-30 seconds and work your way up.
- Breathe Steadily: Don’t forget to breathe. Inhale through your nose and exhale through your mouth, keeping a steady rhythm.
- Release Gently: When you’re ready to come out of the pose, gently lower your knees and sit back on your heels for a rest.
14. Corpse Pose
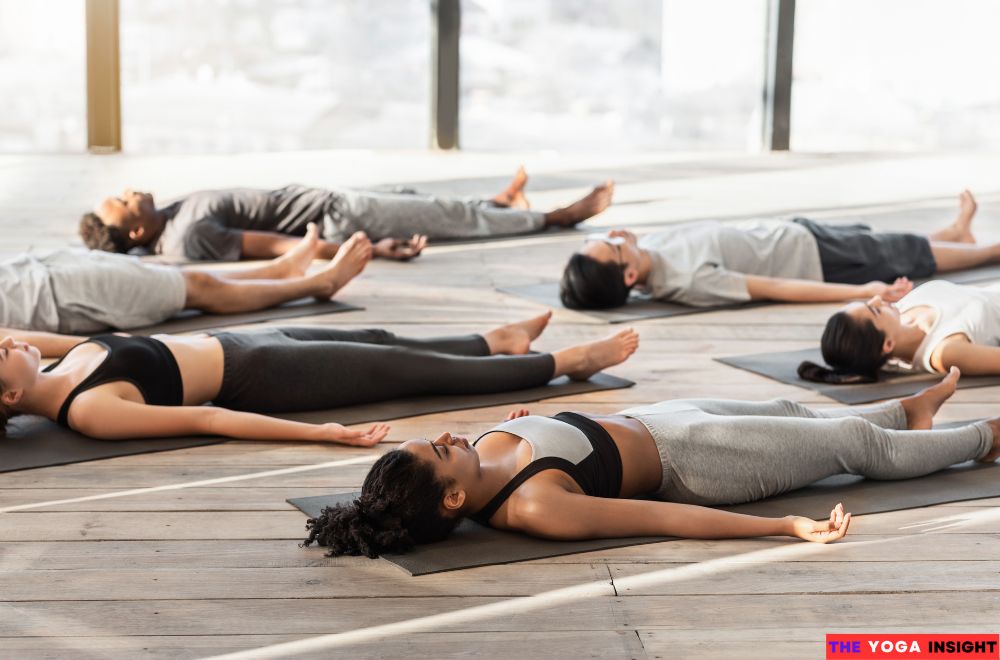
This pose helps the body absorb all the benefits of your yoga practice. It allows your nervous system to relax, bringing your body into deep rest. Physically, Savasana releases any remaining tension in the muscles. Mentally, it helps clear your mind, promoting a sense of calm and peace. Think of it as hitting the reset button after a busy day—Savasana gives you a moment to breathe, pause, and reflect.
Step-by-Step Instructions:
- Find a Comfortable Spot: Lie down flat on your back. If you’re on a yoga mat, ensure it’s smooth and not bunched up.
- Spread Out: Let your legs fall open naturally, with your feet about hip-width apart. Place your arms alongside your body, but not touching. Your palms should face upwards, symbolizing openness and relaxation.
- Adjust Your Body: Close your eyes. Place a small pillow or towel under your knees if your lower back feels strained. This slight adjustment can make a big difference in comfort.
- Breathe and Let Go: Take a deep breath in, and as you exhale, let go of any tension in your body. Start from your toes and mentally scan your body upwards, releasing tension.
- Stay Still: Remain in this position for at least five minutes, though 10-20 minutes is ideal. Focus on your breath or a peaceful thought. If your mind wanders, gently bring your focus back.
- Wake Up Slowly: When ready to come out of Savasana, deepen your breath. Wiggle your fingers and toes to bring awareness back to your body. Roll to one side, stay there momentarily and slowly sit up.
15. Easy Pose
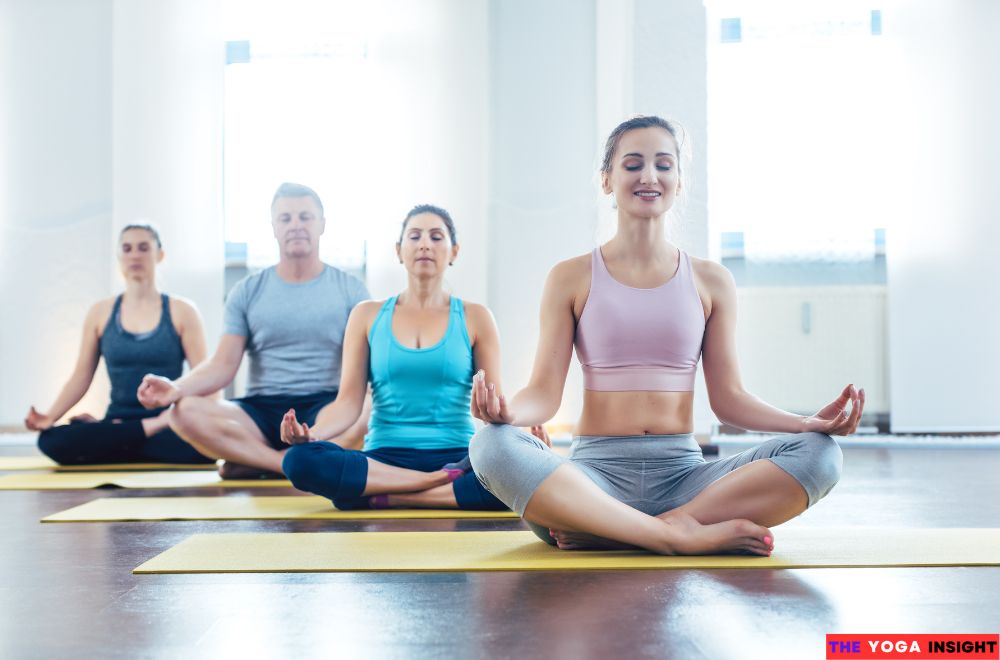
Sukhasana is often the go-to pose for meditation, and there’s a good reason for that. It’s designed to help your body relax while keeping your spine aligned. This combination allows you to breathe deeply and steadily, which is the foundation of meditation. But there’s more to it. Sukhasana also gently stretches your hips, knees, and ankles. For those who spend a lot of time sitting in chairs, this pose can counteract the stiffness and tightness in the lower body.
Step-by-Step Instructions:
- Start with a Seat: Find a comfortable place on the floor. Sit down with your legs extended in front of you.
- Cross Your Legs: Slowly bring your legs into a cross-legged position. If it feels uncomfortable, you can place a cushion under your hips for extra support.
- Straighten Your Spine: Sit up tall, elongating your spine. Imagine a string pulling you up from the top of your head. Keep your shoulders relaxed.
- Rest Your Hands: Place your hands on your knees, palms facing up or down—whichever feels more natural.
- Close Your Eyes and Breathe: Close your eyes and take slow, deep breaths. Focus on your breath, letting it anchor you in the present moment.
- Stay Still: Hold this position for as long as it feels comfortable.
Read More: 10 Yoga Poses for Lower Back Pain Relief
FAQs About Yoga Poses for Beginners at Home
How often should beginners practice yoga at home?
Starting with 2-3 times a week is perfect for beginners. As you become more comfortable, you can increase the frequency. Even 10-15 minutes daily can make a big difference over time.
What should I wear when practicing yoga at home?
Comfort is key. Wear something that allows you to move freely, like a T-shirt and leggings. Avoid anything too loose that might get in the way during certain poses.
Do I need any special equipment for yoga at home?
All you need is a yoga mat. A towel or carpet can work in a pinch if you don’t have one. Props like blocks or straps can be helpful but aren’t necessary when starting.
Can I practice yoga at home if I’m not flexible?
Absolutely! Yoga is not about being flexible; it’s about becoming more in tune with your body. Flexibility will come with time and consistent practice.
Final Thought
Yoga poses for beginners at home offer an excellent opportunity to start a personal wellness journey. You’ll build a strong foundation by practicing poses like Mountain Pose, Downward Facing Dog, Warrior I, and Child’s Pose.
Remember, yoga is a practice, not a perfection. Approach each pose with curiosity and patience, and you’ll find that yoga can be a rewarding addition to your daily routine.
Whether you’re looking to improve your flexibility, build strength, or find a moment of peace, these yoga poses for beginners at home are a great place to start.

